How to draw geometric elements in Schmidt’s net
Welcome to part two of the basics. Here you will learn how to draw geometric elements (planes and vectors) into a Schmidt’s net in Clar’s notation (Dip direction/ Dip angle). Alright, then: let’s not waste any more time.
You will need a copy of a Schmidt’s net (preferably a large copy with all 360 natural numbers of degrees marked), a tracing paper (just take a sheet protector and cut it in pieces with a scissor), at least one overhead marker, a rubber (eraser) and a drawing pin. All at hand? Wonderful. First pinch the drawing pin backwards through the centre of the Schmidt’s net and the tracing paper, so that the latter lies on top of the net. Now take a marker and draw the outline of the net on the tracing paper. Mark the four directions. You should now be left with something that look like what you can see in Fig. 1. As you can see there, only 10°-lines are marked. And don’t you wonder: I pimped my photos a bit up so that you can see the colours better.
In case you made a mistake, you can simply use our rubber and rub the marking out. Or you can take the rubber and stick in onto the drawing pin so that if you fall asleep you do not wake up with a pin in your forehead. We want to learn something about geology, not neuroscience here!
Then you look at the object that you want to draw. For convenience sake let’s use an example similar to part I, shall we? That means we are drawing plane with the following values:
English notation: 45/30/SE
Clar’s notation: 135/30
In case that you are ever have do to this on a computer: a plane equals to a planer great circle.
Now you best mark the strike directions and the dip directions on the outermost circle of the tracing paper. You can see that in Fig. 2, where I marked the strike directions red and the dip direction green.
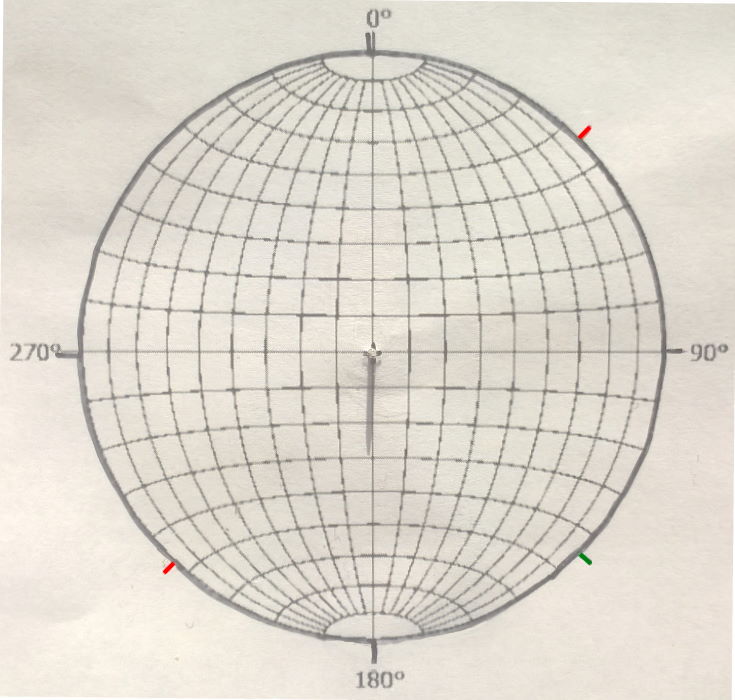
red: strike markings
green: dip direction marking
In case that you are ever have do to this on a computer: a plane equals to a planer great circle.
Now you best mark the strike directions and the dip directions on the outermost circle of the tracing paper. You can see that in Fig. 2, where I marked the strike directions red and the dip direction green.
Now you need some place for your elbows: rotate you tracing sheet until you strike marking are directly N-S aligned. If you drew everything correctly, then your dip marking should be touching the East-marking. If this is not the case, then you made a mistake. You can see how it is supposed to look like in Fig. 3a.

3a: alignment of the markers with the general directions
3b: marking of the dip angle of the plane/grat circle (planar)
Now we have to take a look at the dip angle. In our example the dip angle is 30°. Therefor we must count from the outside 30 units (“degrees”) to the centre. In my cases that means three lines (see Fig. 3b) inwards. If you have done it, simply mark the line that is cut by the point you just made and the strike markings (see Fig. 4a). Now we have created a planar object, meaning a plane.
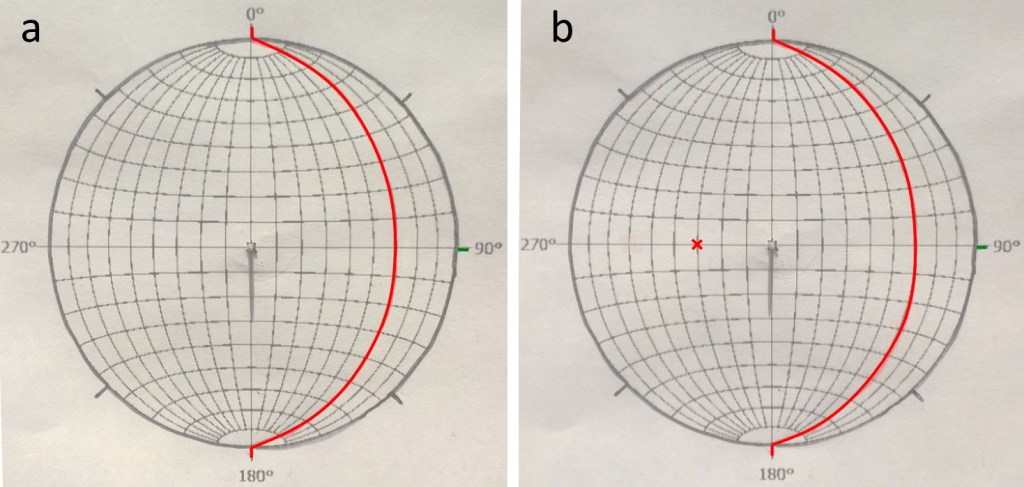
4a: drawing of the plane
4b: marking of the normal vector; a linear element of the net
However, you can probably guess that if you draw a lot of great circles into one net, this soon gets messy. Therefor we now use a little trick. Do you remember, how I told you in Pt. I that planes can also be defined by their normal vector? Yes? Good. We call such a vector a linear; in the net is manifests itself as a point. In order to create this point, you just must go 90° on the equatorial line from your dip marking to the other side and make a little cross or other marking there (see Fig. 4b). Especially now this seems a bit pointless, but imagine that we are not dealing with one, but maybe…100 measurements. I think you can agree, that in this case some points are much more helpful than 100 circles. However, you of course must specify that these linears are the normal vectors of the planes.
And now the only thing that you have to do is rotate the Schmidt’s net back into its original position, like you can see in Fig. 5.
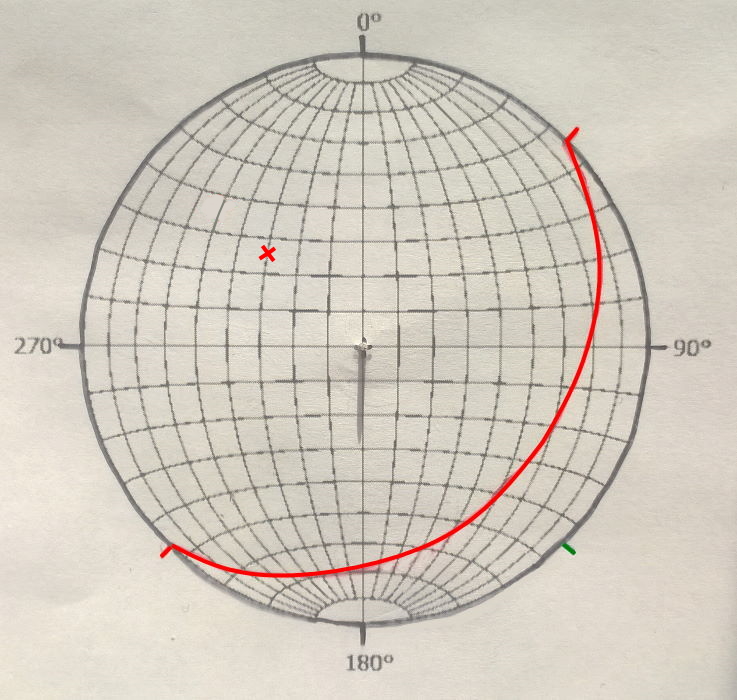
All elements are drawn and the tracing paper is rotated back into its original position.
In case you are maybe wondering that now: a linear follows the same way of notation as a plane. Therefor; if we use Clar’s notation, this specific linear would strike with 315/30. Just do the same steps as before but skip the drawing of the great circle.
Therefor I would advise you to always write yourself down, whether you are measuring a planar or a linear object.
And there you have it; now you know the theoretical framework behind Schmidt’s net, and you can also draw elements into it. Tune in again next time, when we discuss how we can characterise folds with Schmidt’s net.
